Capture User Attributes
- Former user (Deleted)
- Aleksandra Klusińska (Unlicensed)
- Florian Wilhelm (Unlicensed)
- Former user (Deleted)
This entry provides detailed information on how to capture custom user attributes.
| Contents of the Table |
|---|
Use Cases
Because every website has its own content and structure it is important to customize the DMP On-Site Pixel according to your client needs. The Custom Data feature enables you to capture relevant elements from a specific website/webpage that are available from the source code or even from user-generated content and send it to the DMP in real-time. This enables you to store highly relevant data attributes that can be used to create advanced Custom Audiences. This feature return the text (content) of an HTML element, the SCR attribute it it is an image, the value if it is an input and the content attribute in case it is a meta tag.
Elements
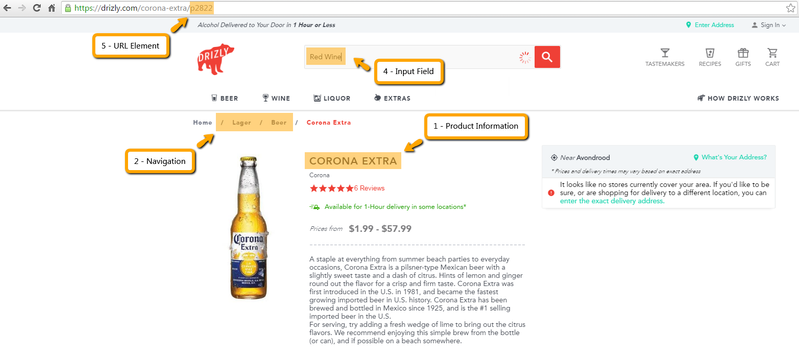
The showcase below contains some specific elements that can be captured from a website. Click on the image to show in full-screen modus.
| Element | Use Case | Item |
|---|---|---|
| Product Information | Capture the ID or name of a specific product or even the description | 1 |
| Navigation | Capture the breadcrumb values that categorizes product items | 2 |
| Counter(s) | Capture the value of a shopping basket or account balance | - |
| Input Field(s) | Capture the value for a specific webform input field, like the search bar | 4 |
| Radio Button(s) | Capture the preference of choice from a predefined set of radio button options | - |
| URL Element | Capture a specific part from the webpage URL* | 5 |
| * Only possible with custom JavaScript code. | ||
Implementation
A step-by-step guide on how populate custom data via the user interface:
Go to the website where the On-Site Pixel is implemented and Identify the specific element that needs to be captured.
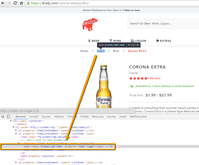
Use your browser developer console to inspect the element.
Click on the element you want to capture in the DMP.
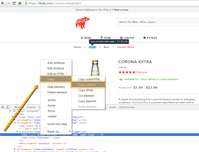
- Click on 'Copy selector' from the right mouse dropdown to copy the exact location of the highlighted element.
- Login to the DMP, go to the Data Collection overview and click on 'Configure On-Site' for the relevant Pixel.
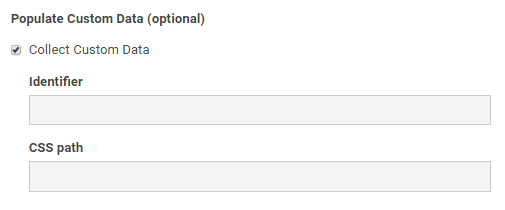
- Create a Custom Event or Custom Success Event, define the conditions and click on 'Capture User Attributes' from the right menu.
- Define an 'Identifier' (key) for the custom data attribute to store in the DMP.
Paste the selector from your clipboard in the 'CSS path' input field in the DMP user interface.
Click on 'Save'.
Error Prone
Please note that any changes applied to the source code of the website may result in an invalid configuration of the CSS path. Therefore, it is advised to use static and unique IDs that represent the class of the variable rather than a descriptional CSS path.
Example
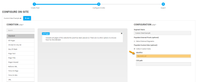
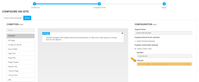
Based on the guidance from the step-by-step guide, the below screenshots show the custom data configuration for the second element (breadcrumb) as mentioned in the example at the top of this wiki entry.
| Step 1-3 | Step 4 | Step 5-7 | Step 8 |
|---|---|---|---|
|
|
|
|
Common Questions
- How to test if the CSS path is right?
You can verify if the specified CSS path will return the appropriate value by open your browser developer console and run the following JavaScript code: alert($('CSS_path').text()); How will the custom data be reflected and stored in the DMP?
The key for the custom data attribute as well as the value will automatically be translated into JSON format and stored in the external_data attribute as part of the DMP's log format. Hereafter, the custom data attributes can be parsed into seperate attributes and enabled for the various DMP features. This process is described further down this wiki entry. The example below shows a key:value pair as stored in the raw data.{ "top_level_cat": "Lager" }
Custom Code
Advanced
It is also possible to write your own JavaScript code and apply it to a given DMP Pixel in order to collect custom data attributes. The script can then be added at the first step, without the <script> tags.
JavaScript Template
Below the template that can be used for defining and sending custom data attributes to the DMP.
var_statement ; conditional_statement {flx1.data('variable_key', attribute_key, true)}
| Elements | |
|---|---|
| var_statement | The variable statement declares a variable, optionally initializing it to a value. |
| conditional_statement | The conditional statement executes a statement if a specified condition is true |
| variable_key | This represents the variable_key that needs to be specified by the implementation specialist using JavaScript. |
| attribute_key | This represents the attribute_key that will be send to the DMP. |
| true | This is the outcome of the conditional statement as part of the JavaScript that initiates the custom data pass. |
Simple Example
A step-by-step guide on how populate custom data via the custom code. Note that step 3 from the below guideline is optional and not required.
- Define a name for variable: var var_name
- Include the css path to the new variable: $('var_location').text()
- Add the trim method to remove whitespaces from both ends of the string: $('var_location').text().trim()
- Write a conditional statement to only capture the variable if the condition is true: if (var_name.length > 0)
Define the custom data attribute according to its conditional statement: flx1.data('var_name', attribute_key, true)
Add the JavaScript code to the relevant On-Site Pixel in the Data Collection user interface.

For the example the complete JavaScript code that captures the 'Lager' value from the breadcrumb look as follows:
var TopLevelCategoryBreadcrumb = $('body > div.wrapper.site-container.snap-content > nav > div > ol > li:nth-child(2) > a > span.breadcrumb-name').text().trim();
if (TopLevelCategoryBreadcrumb.length > 0) {
	flx1.data('top_level_cat', TopLevelCategoryBreadcrumb, true);
}
Advanced Example
Based on the guidance from the step-by-step guide, an even more advanced example will be given below. It shows the custom code configuration to capture the fifth element (URL) as mentioned in the example at the top of this wiki entry. The use case is to strip and capture the product ID from the following URL structure: https://drizly.com/corona-extra/p2822.
- Define a name for variable: var urlParts
- Define the path to the urlParts by a JavaScript expression: document.URL.split('/');
- Define a new variable name to consolidate only the last part of the urlParts: var lastPart
- Define the path to the lastPart variable by a JavaScript expression: urlParts[urlParts.length - 1];
- Write a conditional statement to only capture the variable if the 'p' is the first character of the last URL part: if (lastPart.indexOf('p') === 0)
- Define a new variable name to consolidate the ID and strip the 'p' part: var productId
- Write function to remove the 'p' parameter since we only want the iD: lastPart.replace('p', '');
Define the custom data attribute according to its conditional statement: flx1.data('product_item_id', productId, true);
Add the JavaScript code to the relevant On-Site Pixel in the Data Collection user interface.
The complete JavaScript code that captures the '2822' value from the URL looks as follows:
var urlParts = document.URL.split('/');
var lastPart = urlParts[urlParts.length - 1];
if (lastPart.indexOf('p') === 0) {
 var productId = lastPart.replace('p', '');
 flx1.data('product_item_id', productId, true);
}
Enable Attributes
Once collected and stored in the DMP, the custom data attributes can be enabled for reporting and/or audience building purposes. The DMP has a feature that provides end-users the ability to manage the enablement of the relevant custom data attributes for the Custom Audience feature and Report Central feature from within the user interface. This feature is called the 'Custom Data' scanner and described below. In addition, an API service can be leveraged to programmatically take care of this.
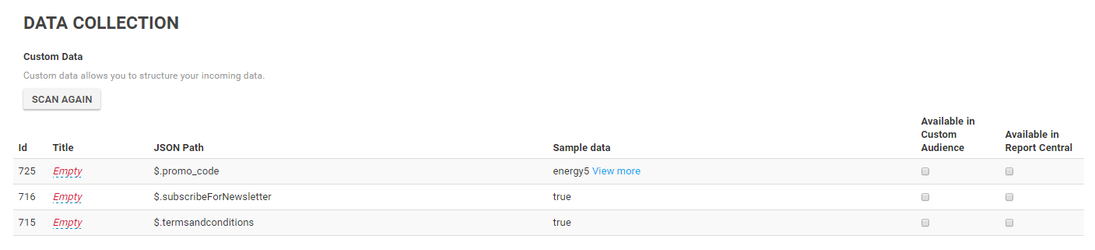
Custom Data
The 'Custom Data' scanner provides an overview of all custom data attributes being collected for your DMP account in an interactive table. The end-user has the ability to apply settings on the custom data attributes on an individual level:
| Column | Description | Example |
|---|---|---|
| Id | The ID of the custom data attribute that has been automatically assigned by the system. | 123 |
| Title | The name of the custom data attribute that can be entered by the end-user. This will serve as the identifier across the features in the user interface. | Top Level Category |
| JSON Path | The key of the custom data as being stored in the JSON string of the external_data attribute. | $.top_level_cat |
| Sample data | Shows an example value (snapshot) extracted from the external_data attribute. It serves as a verifcation. | Lager |
| Available in Custom Audience | Checkbox to enable/disable the custom data attribute the checkbox is ticked, the custom data attribute will become available in Report Central. | - |
| Available in Report Central | Checkbox to enable/disable the custom data attribute the checkbox is ticked, the custom data attribute will become available in Report Central. | - |
A step-by-step guide on how custom data attributes can be enabled for the various DMP features.
- Login to the DMP, go to the Data Collection overview and click on 'Custom Data'
- Click on ‘Scan Data’. The system will scan for data which is imported. This may take several minutes dependent on the number of custom data attributes.
- Once the system completed the scan, the following settings needs to be applied in order to enable the custom data attribute in the user interface:
- Title: provide a descriptive name for the custom data attribute.
- Available in Custom Audience: tick the checkbox to make it available in the Custom Audience feature.
- Available in Report Central: tick the checkbox to make it available in the Report Central feature.
- The settings will be automatically saved in-line so once finished you can go back to the Data Collection overview.
Common Questions
- Can you specify whether the custom data attribute should be a dimension or measure? In other words, is the data type configurable?
No, at the moment all enabled custom data attributes will become available as dimensions, it's not possible to change them into measures yet.
- Under which category does the custom data attibute fall in the Custom Audience feature?
All enabled custom data attributes will be part of the 'Custom' category in the Custom Audience feature. It's not possible yet to select or create another category.
- Does the overview of the Custom Data scanner only contains attributes that are manually be configured by the implementation specialist?
No, it will also include custom data attributes originating from the various On-Site Pixel modules that are enabled for the DMP account. Read the Capture User Attributes wiki entry for more information.