Pixel Tracking Implementation
- Former user (Deleted)
- Aleksandra Klusińska (Unlicensed)
- Florian Wilhelm (Unlicensed)
This section covers all information about the Implementation of the DMP Pixels.
| Contents of the Table |
|---|
On-Site Pixel
Place this exported code (Javascript) on the website. For an easy implementation it is advised to put it in a centralized <head>Pixel</head> or <body>Pixel</body> section.
Pixel Activity Monitor
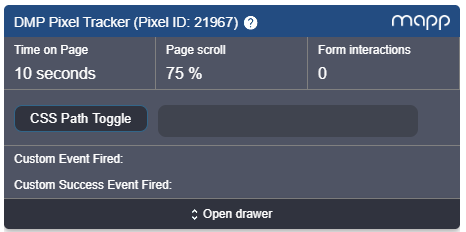
An important step of the implementation is to check whether the pixel is implemented correctly and the data is being collected properly. In order to do so the DMP includes a feature to verify the DMP pixel loads in a user-friendly way and without the need for developer skills. The Pixel Activity Monitor can be enabled as an On-Site pixel module and serves as a tool to verify the DMP pixel is active on the website. It will pop-up as a floating and draggable element in your browser and shows all data events that are initiated by the implemented pixel script. This also includes interaction events like ‘Time on Page’, ‘Page Scroll’, and ‘Form Interactions’ that are originating from the default pixel modules. Please note that this module is not available by default.
A step-by-step guide on how to enable the Pixel Activity Monitor:
- Reach out to your DMP Account Manager to activate this module..
- Go to Data Collection and create a new Pixel or choose an existing one.
- Tick the box to enable the Pixel Activity Monitor for this Pixel and click on Save and Export.
- Browse to the corresponding website and add http://www.sitedomain.com?flx1debug=1 to the URL.
Demo
Note that the tool can also be used for demo purposes. An extension like Greasemonkey (Firefox) can be used to automatically run the Pixel script on a given website.
Impression Tracking Pixel
Add the exported code to the creative in the execution platform. Most platforms support 3rd party impression tracking through one mechanism or another. Many ad servers include a user interface which lets you paste in third-party Impression tracking URLs. If the ad server doesn’t have a UI for trafficking third-party impression tracking URLs, you should still be able to include them at the creative level. Some ad servers offer creative templates that include options for third-party trackers. With other ad servers you might have to change the creative type to one that lets you enter or edit the HTML code for the creative.
Template
The default impression tracking pixel template can be found below:
https://go.flx1.com/imp?id=12345&m=11&pl=1
Parameters
- Required: The "id", "m" and "pl" parameters are required and static in a sense that they may not be changed. The "id" represents the pixel_id, the "m" represents the customer_id that is assigned to your DMP instance ID (this will always be the same for your account) and the "pl" represents the "platform" for which you exported an impression tracking pixel.
- Optional: The impression trackers pixels can be customized to a large extent by means of predefined parameters as part of our log format.
Macros
Creative macros allow you to transmit impression-level information to systems outside of the execution platform - in this case our DMP - which you can then use for audience building purposes, reporting and/or campaign optimization. In this example, you would like to capture information about the advertising campaign and inventory you're buying and store it in our DMP.
Pixel Type(s)
Our DMP supports the export of both a JavaScript and an image type impression tracking pixel. The only difference that may be noticed from the export URL is the additional "t=gif" parameter. In most execution platforms you only have to add the URL of the pixel and choose between a type for the actual implementation. However, if this is not supported you need to implement the impression tracking pixel as HTML tags which can be done as follows:
Javascript Pixel Example
<script src="//go.flx1.com/imp?id=12345&m=11&pl=1"></script>
Image Pixel Example
<img src="//go.flx1.com/imp?id=12345&m=11&pl=1" width="1" height="1" />
Secure Protocol
With the implementation as outlined in this entry our pixel automatically determines the correct protocol and handles the requests according to the standard(s).
Click Tracking Pixel
Add the exported code to the creative in the execution platform. Most platforms support 3rd party click trackers and offer a feature to simply copy/paste a click tracking template as part of the user interface. In addition, most execution platforms do have a landing page URL macro available that can be set as value for the "&out" parameter to automatically redirect to the landing page that is set on another level (i.e. advertiser or campaign). If this is not supported you can either put the click tracking pixel in front of the landing page url or add it to the creative code that will be trafficked directly into your ad server.
Template
The default click tracking pixel template can be found below:
https://go.flx1.com/click?id=12345&m=11&pl=1&cid=12345678&out=
Parameters
- Required: The "id", "m" and "pl" parameters are required and static in a sense that they may not be changed. The "id" represents the pixel_id, the "m" represents the customer_id that is assigned to your DMP instance ID (this will always be the same for your account) and the "pl" represents the "platform" for which you exported a click tracking pixel. The "cid" and "out" parameters are also required but may be dynamically populated. The "cid" respresents the creative_id of the ad unit and the "out" parameter initiates a redirect to the landing page URL. Therefore, the "out" parameter should always be the last element of the Click Tracking Pixel and the value must be either the actual URL of the landing page or a macro that populates the landing page url automatically.
- Optional: The impression trackers pixels can be customized to a large extent by means of predefined parameters as part of our log format.
Macros
Creative macros allow you to transmit impression-level information to systems outside of the execution platform - in this case our DMP - which you can then use for audience building purposes, reporting and/or campaign optimization. In this example, you would like to capture information about the advertising campaign and inventory you're buying and store it in our DMP.
Secure Protocol
With the implementations as outlined in this entry our pixel automatically determines the correct protocol and handles the requests according to the standard(s).
Common Questions
- What is the difference between the referer_url and the event_referer_url?
The referer_url is present in the 'Request Header' section of the browser console and represents the referer of the pixel itself. In case a user enters a page on which the pixel is active and being loaded for the first time this referer_url is always similar to the actual event_url. When you then visit the 'next page' it will be the url of the first page visit where the pixel was loaded. Consider this as the internal pixel referer_url. The event_referer_url is present in the 'Query String Parameters' section of the browser console. This is the referer_url as represent in the 'Query String Parameters' section. As an example you could imagine that a user has entered the page on which the pixel is active as a result of clicking on a google search entry and can therefore be seen as the cross-domain referer_url.
As a developer responsible for the pixel implementation, are there any other methods to verify the pixel implementation?
Yes, Firebug or comparable tools can be used to verify the generic DMP pixel loads and the successful measurement of the enabled interaction tracking modules. It can also serve as quick check to make sure the successive segment and conversion events are implemented properly. First navigate to the website where the On-Site Pixel is active.ToolMethodFirebug Validate that the pixel is loaded by looking into the Net panel and search for 'customer_id-pixel_id.js' being called from the 'c.flx1.com' domain. Tip: use the relevant pixel_id as a filter value. Chrome Validate that the pixel is loaded by looking into the Network panel of the Developer Console and search for 'customer_id-pixel_id.js' being called from the 'c.flx1.com' domain. Tip: use the relevant pixel_id as a filter value
- What is the best way to forward the Pixel code to the person who is responsible for the actual implementation?
In case you need to send the pixel to an internal developer or to an external tech department we strongly recommend to copy/paste the pixel into a notepad file and add it as an attachment.
- How to deal with the pixel organization when the client has multiple websites/subdomains?
We strongly recommend to create separate pixels per website/subdomain. From a practical point of view this will allow the client to benefit from efficiencies on DMP features since the Pixel ID is the main global identifier across the system. For example, restricted accounts can be created by permitting access to specific pixels and all reporting features contain filters on Pixel ID to easily gather stats. From a technical perspective it will gain efficiencies in terms of data processing because the Pixel ID is an integer whether filters on contextual attributes like Site Domain and Event URL are based on strings.
- What is the difference between a JavaScript and Image pixel?
JavaScript pixels can execute code, images not. You should always use the JavaScript pixel in case you want to track interactions or fire additional external pixels (piggyback). Note that the configuration of DMP segment and/or conversions requires the JavaScript on-site pixel. You should only use image pixels when there is no option to use JavaScript pixels or for purposes were JavaScript is disabled (e.g. emails).
- Can the On-Site Pixel be placed into a container tag?
Yes, our pixel can be deployed through all tag managers. This includes but is not limited to Google Tag Manager, Qubit, and Tealium.
- Does the DMP Pixel impact performance of the website?
No, all our pixels load asynchronously. Because of this our pixels do not affect the loading time of a website. The asynchronous loading time should be less than one second under normal conditions. You can always inspect the loading time in the console of your web browser.
- Can we implement the pixel on mobile Apps and collect mobile specific attributes like Device ID?
Yes, this is possible even without the need of a Software Development Kit (SDK) and more information can be found in Mobile Implementation. In order to track Device IDs or any other mobile specific attributes the On-Site pixel should be implemented in a mobile app and the instructions below needs to be taken into account by an app developer. Given the example: http://go.flx1.com/px?id=1234&m=11&t=gif&sitid=2&lat=$latitude&lon=$longitude&devid_g=$GoogleAID&devid_a=$IDFA, the values for the mobile-specific parameters (respectively Latitude, Longitude, Google Ad ID and Apple Advertising Identifier) needs to be dynamically populated by using Android (java) and in Swift/Objective C. Please note the following:The parameter "devid_g" is only relevant for Android devices whether the parameter "devid_a" is only relevant for iOS devices.
The parameters "id", "m" are required and automatically generated when exporting a pixel.
The "t" parameter indicates the pixel type and can be either an image pixel (gif) or a script tag (js).
The "sitid" parameter indicates the platform and should always be "2" in case of a pixel that is implemented on a mobile app.
- What can be the cause of discrepancies in terms of loads between the DMP Pixel and an external pixel?
When comparing the data collected by Mapp with similar data collected by other platforms (such as Google or AppNexus), you might notice some discrepancies. There are a few possible reasons for this:Cache: It is possible that third-party software caches pixel requests even though we explicitly specify not to.
Browser plugins: It is possible that clients have tools like ad-blockers installed which block our pixels, not the creatives.
Page drop off: The location and exact implementation of the pixel determines when a pixel will fire. This may differ from third-party tracking, which is placed before or after the Mapp pixels.
Users without JavaScript: In this case, not all of the Smart Pixel Functionality will be enabled on the Mapp pixels.
Illegitimate traffic: Our system has its own traffic quality filters, which exclude non-human traffic like anti-virus software and botnets.
Time zone: Our pixel gathers data in UTC time zone only.
Cross-device: For example, if you are using Google Chrome and are signed in to your account, Google will apply cross-device tracking. (https://developers.google.com/analytics/devguides/platform/user-id)
Session lifetime: Our user IDS are unique as long as the cooking remains intact. Third-party analytics tend to use custom session lifetime (e.g. 30 minutes inactivity).
Latency: The ad server tracks the impression when the auction is completed and then starts the process of displaying the creative to the user. This means that the ad server may also count impression which aren't actually seen by a user due to Javascript errors, network problems or similar issues. We track the impression form the moment that the creative has been loaded - a process which starts a few hundred milliseconds later.