...
- Download the ANE+SWC files from the Appoxee Download Page.
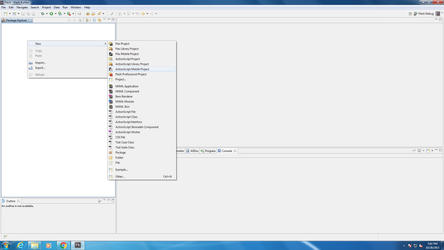
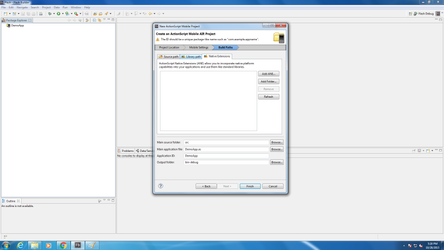
- Create a new ActionScript Mobile Project, as shown in the image.
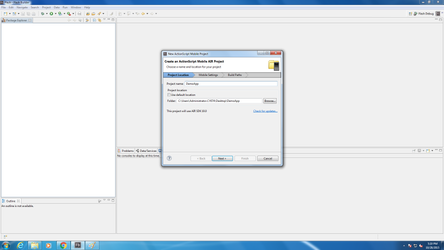
- Name your project , as shown in the image.
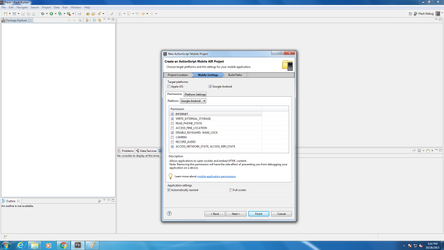
- In the new project's dialog under Mobile Settings tab, mark the following permissions : INTERNET , WRITE_EXTERNAL_STORAGE, WAKE_LOCK, ACCESS_NETWORK_STATE , as shown in the image. Make sure that "Google Android" is ticked under "Target Platforms"
- in the new project's dialog under Build Paths tab, in the Library Path tab, Add the Appoxee SWC. add other SWC files if you use other 3rd party libs.
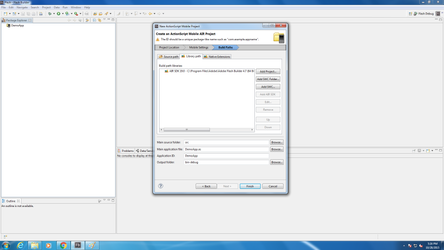
- in the new project's dialog under Build Paths tab, in the Native Extensions tab, Add the Appoxee ANE & the Appoxee GCM ANE file. add other ANE files if you use other 3rd party libs.
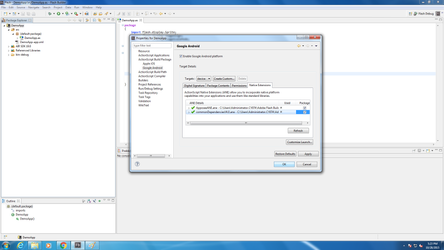
- After the project is generated, go into it's properties, into ActionScript Build Package ->Google Android and tick all the checkboxes of the ANE, including Appoxee's . Press OK.
In your app's XML file , inside the Android tag you will find the Android Additions. Add the following code before the </manifest> tag :
Code Block language xml firstline 1 title Manifest Additions linenumbers true ... <permission android:name="air.DemoApp.permission.C2D_MESSAGE" android:protectionLevel="signature" /> <uses-permission android:name="air.DemoApp.permission.C2D_MESSAGE" /> <uses-permission android:name="com.google.android.c2dm.permission.RECEIVE" /> <application> <meta-data android:name="com.google.android.gms.version" android:value="@integer/google_play_services_version" /> <service android:name="com.appoxee.gcm.PlayIntentService" /> <!-- REQUIRED for C2DM --> <receiver android:name="com.appoxee.gcm.PlayBroadcastReceiver" android:permission="com.google.android.c2dm.permission.SEND" > <!-- Receive the actual message --> <intent-filter> <action android:name="com.google.android.c2dm.intent.RECEIVE" /> <category android:name="air.DemoApp" /> </intent-filter> <!-- Receive the registration id --> <intent-filter> <action android:name="com.google.android.c2dm.intent.REGISTRATION" /> <category android:name="air.DemoApp" /> </intent-filter> </receiver> </application>In your app's main .as file , add the following code :
Code Block language actionscript3 firstline 1 title Code into your main .as file linenumbers true //Add this to imports : import com.appoxee.AppoxeeANE; ... //Add this to class : private var _appoxeeANE:AppoxeeANE; //Add the class's constructor : _appoxeeANE = new AppoxeeANE("YOUR_APPOXEE_APP_KEY","YOUR_APPOXEE_SECRET_KEY",handleIncomingPushMessage); ... //Add this method to get notified when push messages arrive to the device private function handleIncomingPushMessage(payload:String):void { trace("Handle Incoming Push Message Called with : "+result); //handle push payload in callback }Note title Push Notification Callback and Extra Fields Parsing The method handleIncomingPushMessage() id the method that will be called every time a push notification will be received by the device. Further explanation on using the Incoming Push Notification Callback Method can be found herein Appoxee Adobe Air - Handling Extra Fields.
- This conclude the basic integration of the ANE. Click here to see For API usage, see Adobe Air Integration with Android (Mapp Cloud).