...
...
...
...
...
...
| Warning |
|---|
Starting from Sept. 2016 new server key can only be created in the Firebase Console using the Cloud Messaging tab of the Settings panel. Existing projects that need to create a new server key can be imported in the Firebase console without affecting their existing configuration |
Google provisioning consists of the following procedures:
...
Goal: Get your Google Server API key and project number.
Setting up GCM Keys
1: Creating a Google
...
After completing the Google provisioning setup, you can setup Appoxee provisioning.
Step A.1: Creating a Google API Project
- Open the Google APIs Console page.
If you have not created an API project yet, this page prompts you to do so now.
| Note |
|---|
| If you already have existing API projects, the first page you see is the Dashboard page. From there you can create a new project, by opening the API Project drop-down list (upper left corner) and choosing Other projects > Create. |
3. Click Create project...
4. Open the Google APIs Console page, make sure your project is selected and note the Project Number.
In Step B: Appoxee Setup, you will be required to enter this number as the Google Project ID.
| Note |
|---|
Do not confuse the Project ID defined here, in the Google API Console, with the Google Project ID defined on the Appoxee website. |
Step A.2: Enabling the GCM Service
...
Step A.3: Obtaining an API Key
- On the main Google APIs Console page, select API Access.
- Click Create new key...
- Note the API key value.
You will be required to provide this information as part of Step B: Appoxee Setup.
You have now completed the Google provisioning setup.
Next Step: Step B: Appoxee Provisioning
...
app
- Go to the the Google Services Wizard.
- Select an existing Google app from the dropdown and type any name to create a new app.
- In the example below , we create an app named
test-application. - Enter Android Package Name and click "Continue to choose & configure services"
- The project is created
2: Enable Google Cloud Messaging
- Click Enable Google Cloud Messaging
3: Get Server API Key and Sender ID
- Note the Server API Key & the Sender ID(Project Number)
- You will be required to provide the 'Project number' and 'API Key' as part of Step B: Appoxee Setup.
You have now successfully completed the Google setup.
Setting up FCM Keys
1) Log in with your Google Account
Open https://console.firebase.google.com/ and log in using your Google account.
2) Click on Add Project
Create your project, click on the add project option.
3) Compose the Project Name and select your country/region
You’ll now be prompted with a modal box like the one shown below. Under Project name, write the name you want and below that, select your Country/region. Once you’ve done this, click on the Create Project.
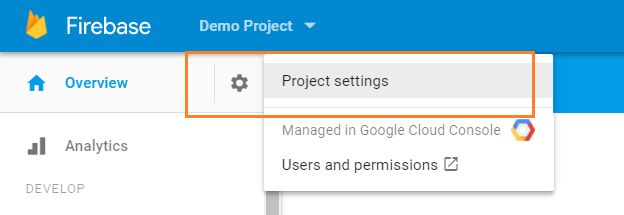
4) Click on Settings icon and then click on Project Settings
Now, on the left side of the panel, next to your project name (and below “Firebase”), you’ll see the Settings icon. Click on it. Now, click on Project settings. Please refer to the images below.
5) Click on Cloud Messaging
On the central pane, you’ll see multiple options. Among these, click on Cloud Messaging.
6) Copy the Server key and Sender ID
You’ll now see the following screen, wherein you'll see your Server key and Sender ID.
7) Continue to Step B: Appoxee Setup. Add sender id as Google Project Number and Server Key in Google Api key option.
You Successfully complete the FCM Setup.
Continue to Step B: Appoxee Setup.


